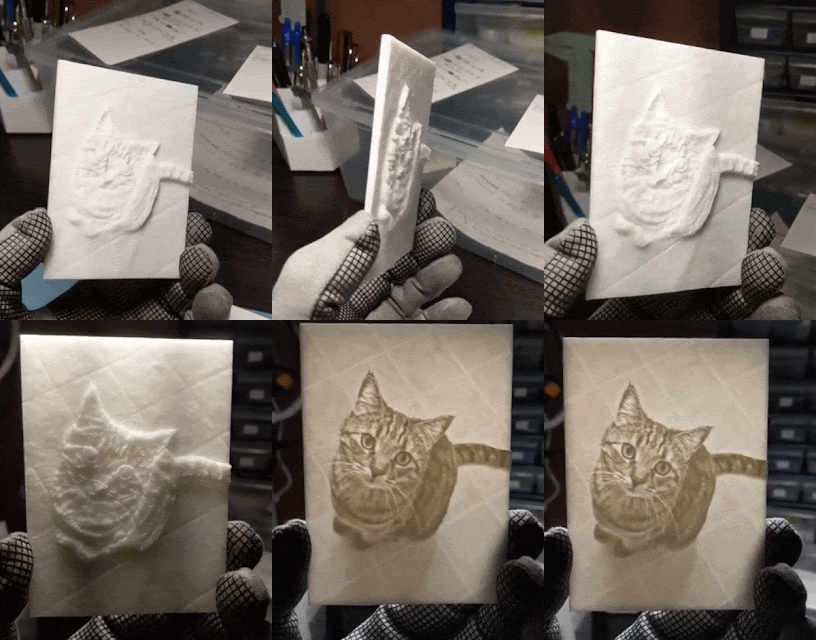
Lithophanes are solid plates of varying thickness, which show an image when lit from behind. Think of them as a carving, where the thick parts are dark and the thin parts are light, so it can make a picture.
Today, it's possible to use 3D printing to crank them out fairly easily but there are a few easy tricks for getting the best results.
Use an Online Tool for the Conversion
This online tool to create lithophanes (update: you can also check out http://itslitho.com/ which has more features) will accept an image and convert to an .stl file for 3D printing. Basically, the brightness of each pixel will be converted to a height value in a 3D model. The tool has plenty of options for you to explore, but you can get useful results with the defaults. You can get even better results with a bit of work up-front.
Screenshot from http://3dp.rocks/lithophane/
Choose the Right Photo for Best Results
For a lithophane that will be illuminated from behind, the best results will come from photos that:
- Look good when converted to greyscale.
- Don't have too many sharp changes from very light to very dark (this will still work, but may be trickier to print and will look a bit distorted when viewed off-center.)
- Convert to Negative before processing.
Convert to Greyscale
In GIMP, convert an image to greyscale with the Desaturate tool.
If the picture still looks good in greyscale, then it should make a good lithophane. In general, the less color in the original picture to begin with, the more "friendly" it will be to conversion into a lithophane. (This example is a grey tabby on an off-white floor, which worked very well.)
Convert to Negative
The online tool I linked to has the ability to flip the image from positive to negative in the settings, but to do it yourself you can use the Invert tool in GIMP:
It's up to you whether to do it yourself, or whether to do it in the tool. I prefer to do it myself so that the conversion is more "what you see is what you get".
The Important Part is Light Spots are THIN and Dark is THICK
Visually inspect the 3D model that the tool generated. Compare with your source image to confirm that THICK parts of the model are the DARK areas of the photo, and the THIN parts of the model are the LIGHT areas of the photo.
It can be a bit hard to judge at a glance when looking at the model because it's a weird-looking height map, but being sure before you start printing will save a lot of trouble.
3D Printing
FDM
Best results for FDM (filament-based, like Prusa, etc) printers will come from using light-colored filament, 100% infill, and at high resolution (thin layer height.)
Print the lithophane in a vertical orientation (i.e. standing straight up and down, not laying flat.) Choose the widest side of the model as the base, and it might be useful to print it with a brim for good adhesion.
SLA (RESIN)
I printed the lithophane shown here on my Formlabs Form 2 printer in White resin. For SLA it was also printed in a vertical orientation, attached directly to the build plate. I chose the widest edge as the base.
I printed at 0.1 mm layers, but if I were to do it again I'd try at a higher resolution. It printed fine but a thinner layer height would have made some of the sharp angles a little less aggressive and would (in theory) improve overall reliability.
Results
Here is the 3D printed plate, and the results when lit from behind. My first attempt wasn't best, but after following the steps I listed here the results were spectacular.
Give it a try, and use the resulting plates to make a lampshade or window ornament. Art is fun!


I know this is old, but I hope you're still on this page. I'm using an Anycubic Mega Zero and Cura. After slicing in the horizontal position, I'm informed that my lithophane will take a mere 9 hours to print. When I change the orientation to vertical, Cura rather smugly informs me that it will only take 2 days to print. Is SLA faster? Do you know if an SLA printer that will not cost me a mortgage payment?
ReplyDeleteIf you are printing with an FDM printer then you should print the lithophane in the horizontal position (i.e. flat on the bed). The math Cura is using to estimate print time might just be getting a bit confused between the two orientations.
DeleteFor resin printers: Elegoo Mars, Elegoo Saturn, or Anycubic Photon seem pretty popular though I don't have much to do with them, I know people who are happy with them. They are about as affordable as you are going to get.